Amazon Kindle has a new book out allowing you to build a home office from 3 sheets of plywood!!!
Relaxed Modern Chair Furniture Plan
![]()
![]()
![]()
Build this very modern chair which could easily fit in an episode of “Mad Men”. This furniture plan with very simple construction allows anyone to make their home just a little more classy. This chair can be made from one piece of 4 foot by 8 foot plywood, a few dowels, a jig saw and drill. This plan also shows how cushions for this chair need to be made as well. Companies like customcushions.com and others can make cushions for you if you don’t have the sewing setup!
Buy this modern furniture plan at Etsy!
Furniture Plans – Step by Step from Inspiration to Reality – Part 1 of 8
This multiple series of how-to articles will explain how I create furniture plans for Plan Canvas and also (hopefully!!) give some answers to those who are curious.
Here’s an overview of the articles that I see fitting in:
1. Inspiration – This is the research part
2. Concept – This is the creative part
3. Theory – This is where all things need to work to make it real
4. Prototype – Make sure it works if real – all in CAD
5. Practicality – Make sure you use as little material as possible
6. Rough Draft – Putting it on paper
7. Publish – Have the Teacher work your check
8. Build and/or Sell! – This one could be a whole separate set of articles, but I’ll outline the steps on my store
So starting at the top!!
INSPIRATION
From as far back as I can remember, I’ve always enjoyed the clean lines of mid-century modern furniture. I grew up with a very good friend of mine in Iowa who lived in a very large ultra-mod house, complete with an Eames chair in the living room. The house itself was incredible, but what really got me is how the house had a style both in and out. Since I knew that the amount of money to spend just building houses was something out of my reach, I decided to start drawing up furniture that had the same feel as Mark’s house. I also drew cars, but we won’t go into my day job…
So nowadays, I tend to review lots of various modern furniture sites, along with a vast array of books. I’ve added links to these sites and some of these books on the blogroll on the right. Don’t focus on anything, just find something that you like, something that strikes a chord. Bookmark, or somehow save up these various areas of inspiration. If you keep into the area of building furniture plans, this becomes seriously helpful for your future projects.
For the purpose of this series of articles, we’re going to look through the development of Plan Canvas’s Chair 00004. This is one of the better selling furniture plans on the site, and has had some really nice reviews 1, 2 (thank you!). The inspiration for the chair was pretty simple – I needed some chairs for our front porch. I had some cheap plastic chairs that we’d junk-picked and they work great, but look horrible. I wanted to have something that looked nice, but didn’t cost an arm and a leg. At the end of this, you’ll see that I ended up designing a chair that can be made from half a sheet of 3/4 inch plywood.
So take your time and browse through some of the links, look on Ebay, search Craigslist, go to your local “antique” shop (Detroit has lots of these) and pick out some pieces that really hit you!!!
What Kind of Plan Do YOU Want?
So I do custom designs for various folks – anywhere from a custom closet organizer to a queen bed made to fit between special window sills.
Either way, its hard to know what people want the most of or if they want something different?
Let’s see what folks say – what do YOU want?
Modern Furniture Plan – Diagonal Storage Coffee Table
Plan Canvas LLC – Diagonal Storage Coffee Table
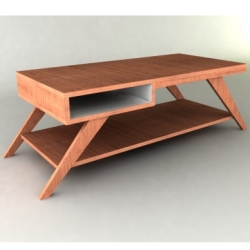
This is a modern furniture plan of a wonderful retro modern style coffee table, perfect for your sunken living room or den! This simple 50’s / 60’s design and extremely easy to build. This table can be made from one piece of 4 foot by 8 foot plywood, a few dowels, and a jig saw and drill.
Table:
Width 20″
Height 16″
Length 52″
Main Supplies
Plywood – 1 Piece of 4′ by 8′ 3/4″ thick ~$20
Dowel Pins – Pack of 50 ~$3
Main Tools: Jig Saw, Drill
About Modern Furniture Plans Blog
I love modern furniture plans. I love design and I love function, but can’t afford to drop $1000 on a table and a couple of chairs. So how can I get what I want? Since I was just out of school, I had very little money to get those gorgeous pieces in my small apartment.
So I started to learn how to build the bare essentials – and find modern furniture plans who’s inspiration came from Frank Lloyd Wright and Eames. I didn’t have any tools, and very little room to build anything, so I tried to figure out the best way to build my new ideas. I started with a jig saw and a hand drill. Then I bought some low grade plywood and started to figure out how to build what I wanted.
The results were better than expected. I was able to build more than just the table and chairs – my whole living and dining room furniture up for about $200. A far cry from the thousands to get the look I really wanted. And as a bonus, it felt good to build my own furniture.
That’s when the idea came up to find plans that anyone could work with to create their own furniture, whether its a seasoned woodworking professional or someone just starting out on their own. To keep it in line with the inexpensive, plywood is a very common material. Its easy to work with, very uniform, and is far better than particle board that a lot of the cheap put-together-yourself stuff is made of.